Active fires
0
Community Veld Fire
Fire reporting and response
Sign in to view active fires, report a pin location, and manage alerts.
Community Veld Fire
Sign in to view active fires, report a pin location, and manage alerts.
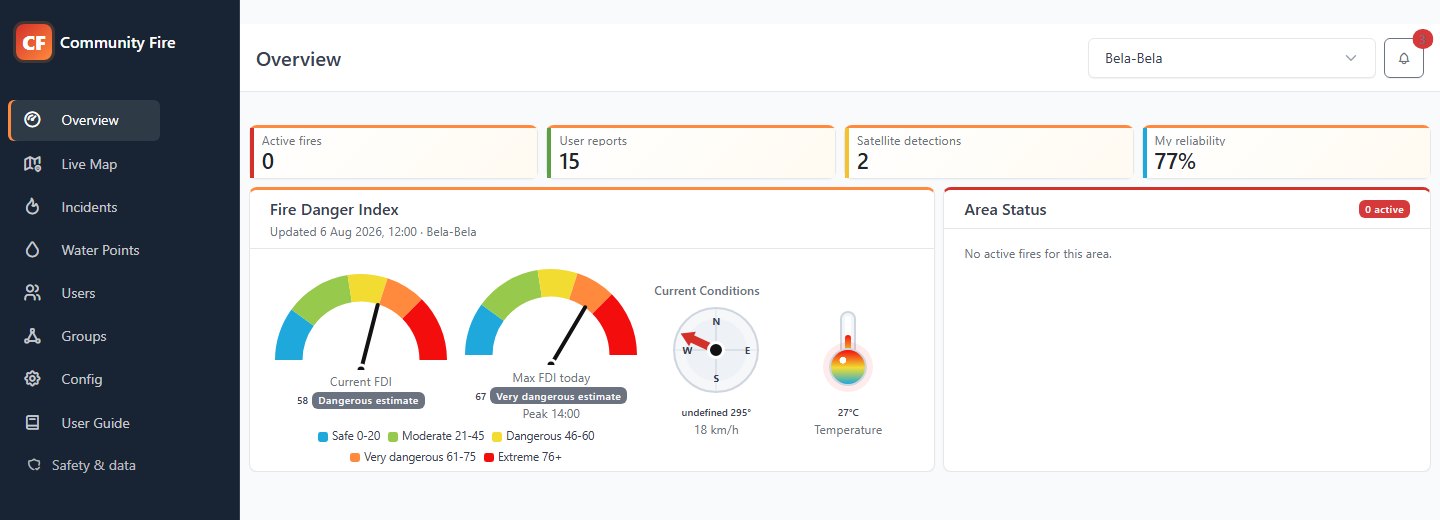
When you open the app, the Overview gives you a quick picture of what is happening in the selected boundary group. If you manage more than one area, use the group selector in the page header to move between them. Everything on the page will update to match that group.
The four figures at the top separate active incidents from all user reports and raw FIRMS satellite detections. A satellite detection is useful evidence, but it is not counted as an active fire until an admin converts it into a report. The reliability figure shows how consistently your own reports have been confirmed.
The Fire Danger Index combines the current and expected maximum risk with the wind and temperature readings. Read these together before making a response decision. On the right, Area Status lists the fires that are still active; from there you can open navigation or share the location through WhatsApp.
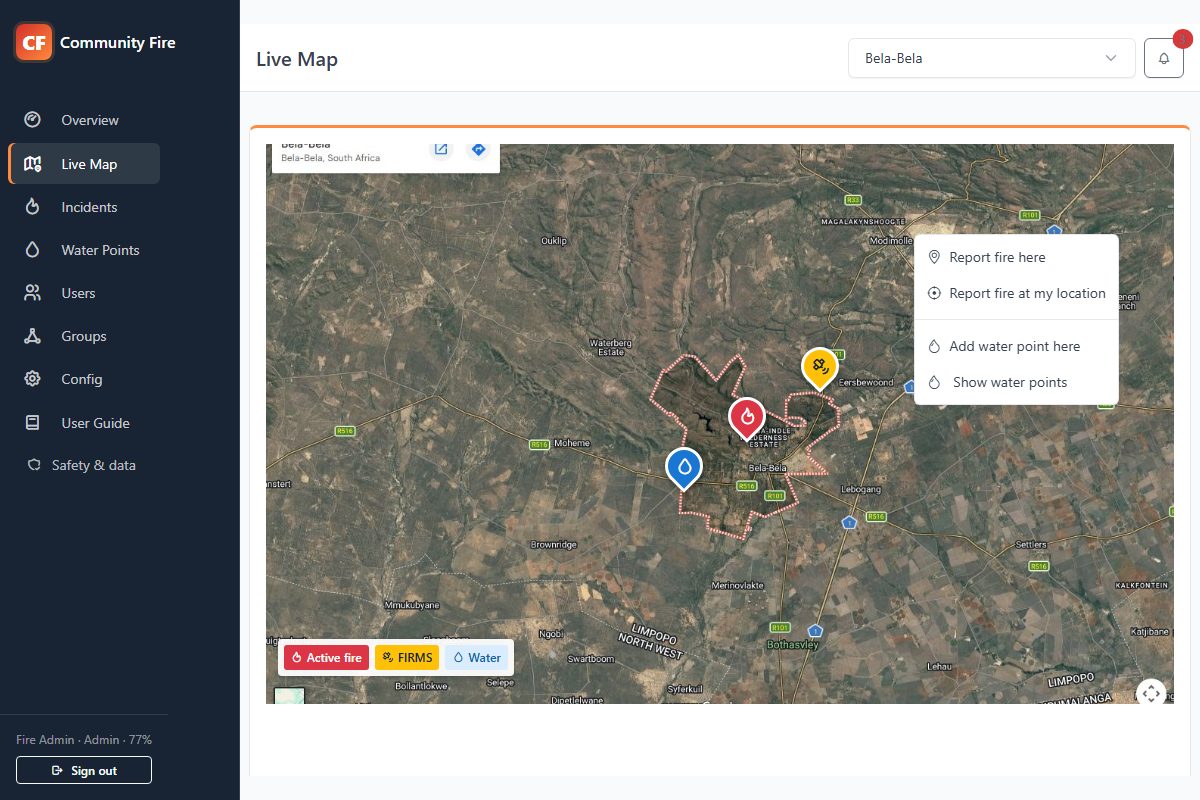
Think of Live Map as the operational view of the selected area. You can pan, zoom, change the map style, or enter full screen with the normal Google Maps controls. The red outline shows the actual group boundary.
Press and hold a position inside that boundary to open the location menu. This is where you can report a fire at the selected point, use your device location instead, add a water point, or ask the map to show water points.
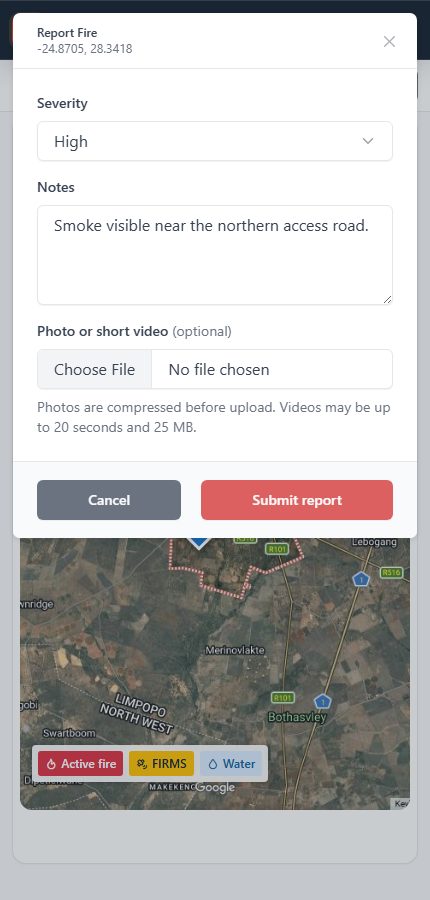
FIRMS detections have their own satellite pin so they are not confused with reported fires. Open one when it looks relevant, then choose the report action to create an incident. The app will ask for severity and notes before placing the active fire pin. When an incident is rejected or put out, its fire pin is removed from the live map.
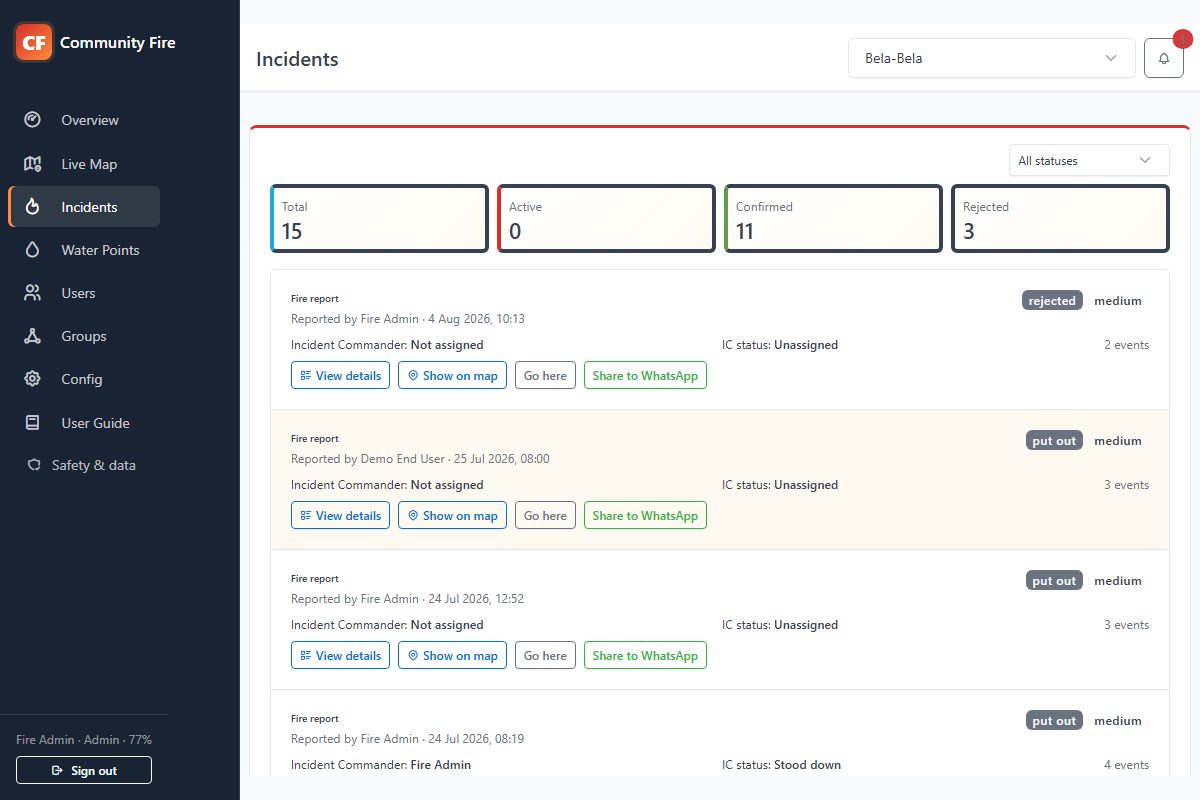
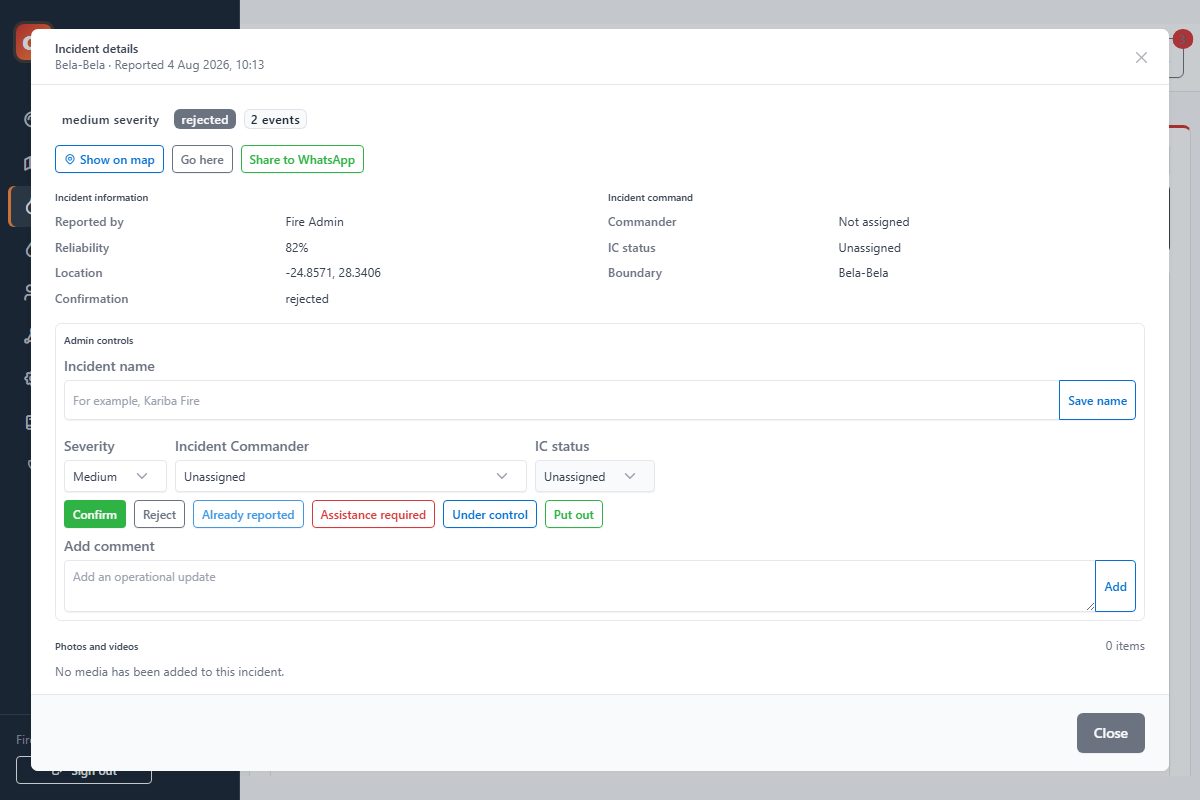
The Incidents page opens with the Active filter selected, so your immediate workload is shown first. Each compact incident row gives you the current status, severity, assigned Incident Commander and number of recorded events without making you scan the full history.
Select View details when you need to work with an incident. The detail window brings the original report, coordinates, reporter reliability and event history together. This is also where an admin confirms or rejects the report. That decision contributes to the reporter's reliability score.
You can change the severity as conditions develop, request assistance, mark the fire under control, or put it out. An eligible admin can be assigned as Incident Commander and tracked from Assigned to On route, On site and Stood down.
Photos and short videos supplied with the report appear in the incident details. Open them only for incident response, and remove unsuitable or unnecessary media. Every upload, view and removal is audited, and files expire according to the community retention policy.
Use the comment field for operational updates that do not change the formal status. Status changes, severity changes, commander updates and comments are all timestamped in the event history, so the incident remains understandable after the fact.
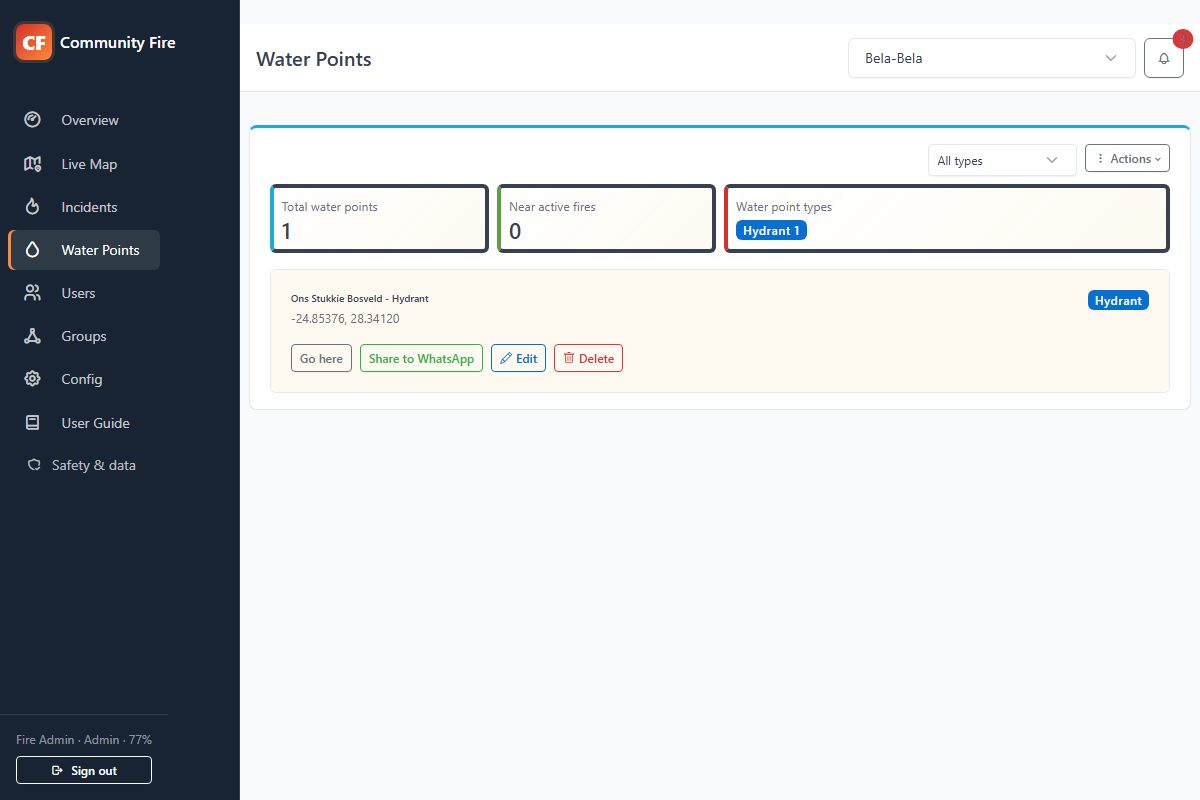
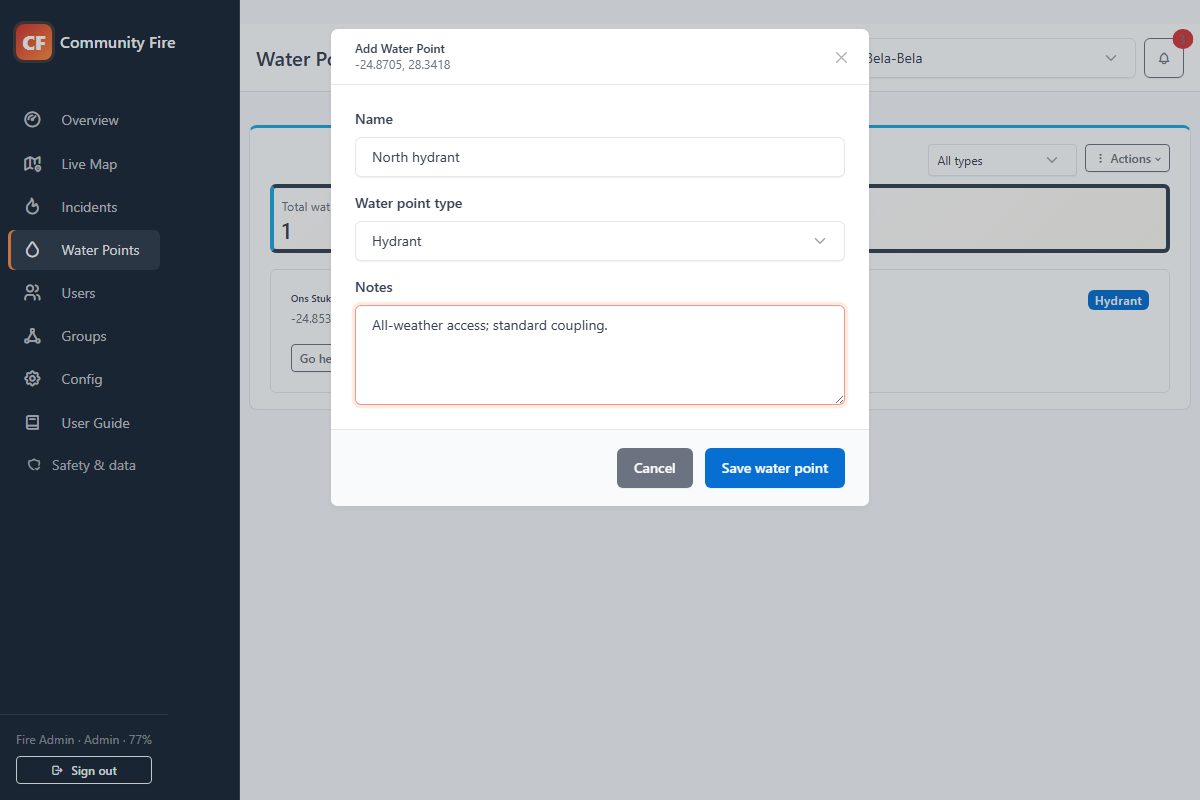
Water Points is the shared directory of usable water sources in the selected area. The summary tells you how many are recorded, how many are close enough to an active fire to be useful, and which types are available. Use the type filter when you specifically need a dam, hydrant, borehole, tank or another source.
Open Actions to add a point at your current location or display every water point on the live map. Give a new point a name that responders will recognize, choose the correct type, and use the notes for practical details such as gate access, capacity, pump fittings or a contact person.
Each entry has Go here for device navigation and Share to WhatsApp for sending the location. As an admin, you can correct or remove any water point in the group.
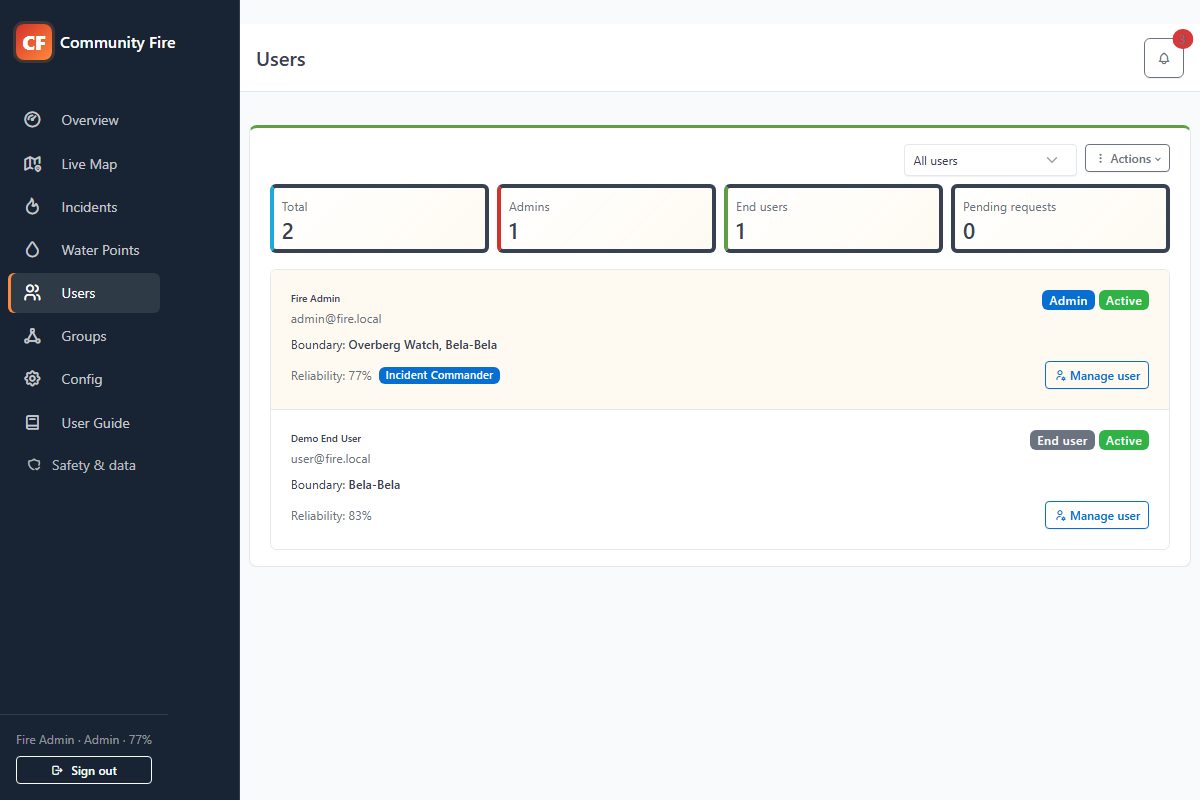
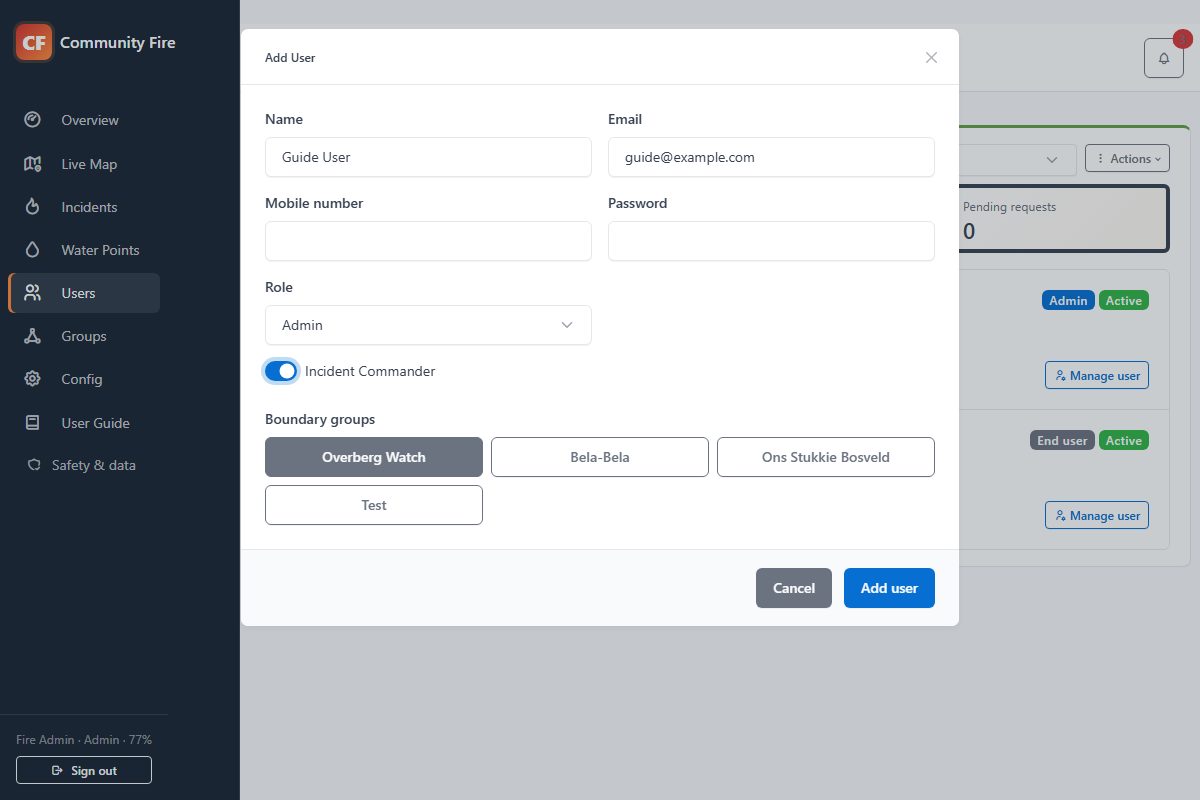
The Users page is where access to the app is controlled. The figures at the top separate admins, end users and Incident Commanders, while the filter helps you find a particular role or review inactive accounts.
When you add a person, choose whether the account is an admin or an end user and link it to the boundary groups that person should see. End users only receive data for their linked groups. If an admin is available to lead incidents, enable the Incident Commander option so that person appears in the assignment list.
Use Manage user later to change the role, group membership, commander eligibility or active state. The reliability value shown on the user record is built from the admin confirmation history of that user's fire reports.
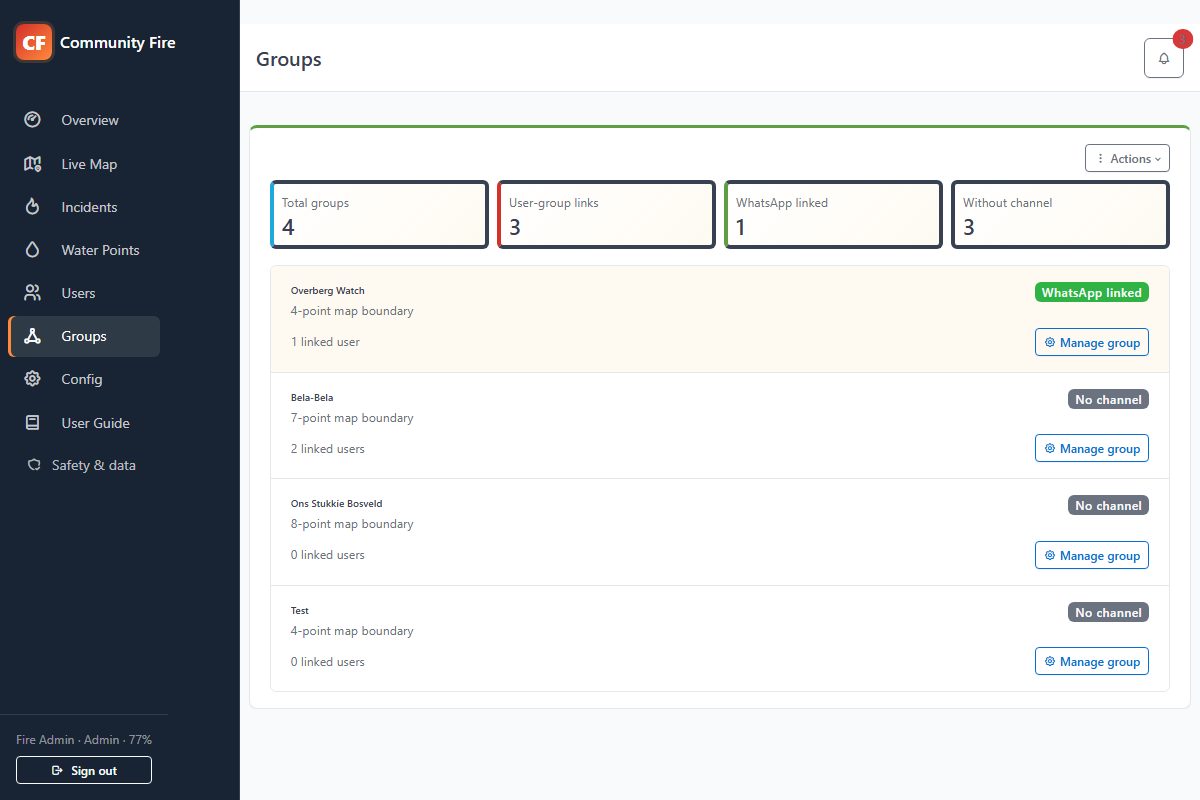
A boundary group ties together an operating area, its users and its alert channel. The Groups page shows how many users are linked to each group and whether a WhatsApp channel has been configured.
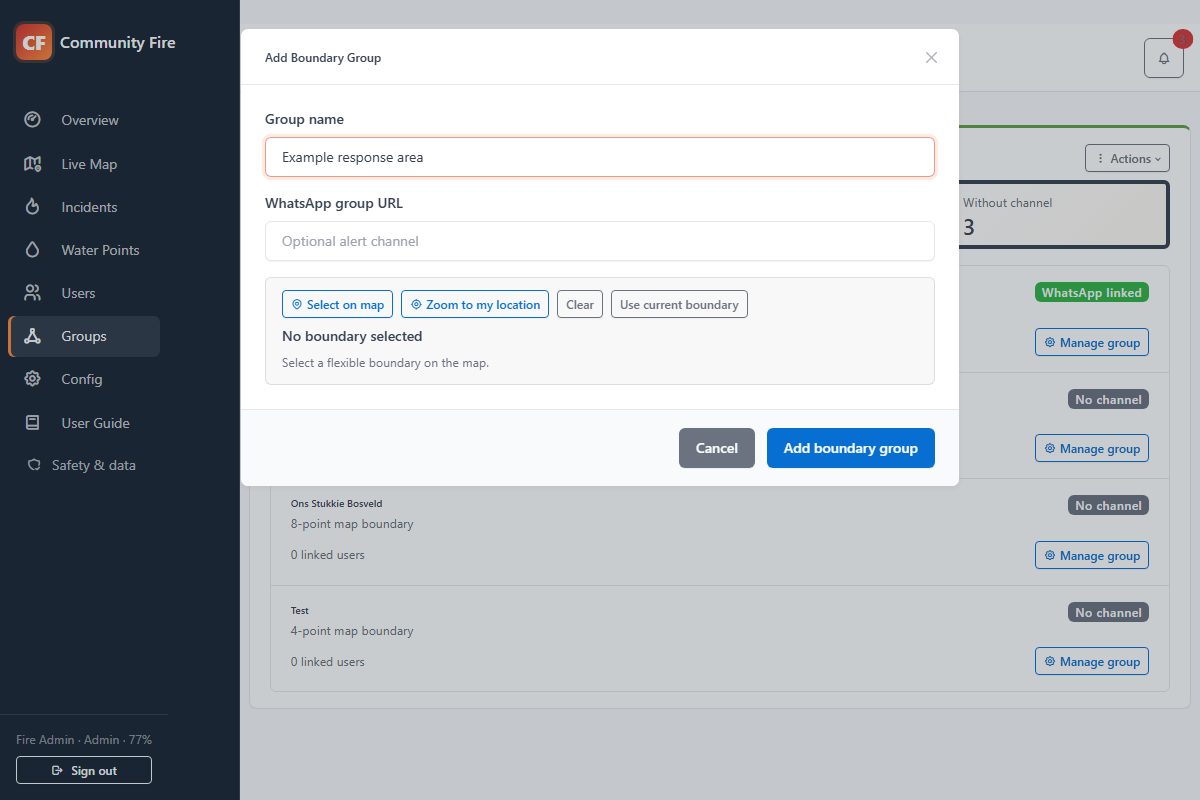
Use Actions to add a group, or Manage group to change an existing one. Give the area a clear name and add the WhatsApp group URL when that channel is ready.
If this is a new community with no boundaries yet, the app opens this setup for you. Use Zoom to my location to move the map near you without saving your position. To define the operating area, choose Select on map, move and zoom until the area is clear, choose Add points, and trace the boundary. After at least three points, select Use boundary and return to save the group.
You do not need to calculate a separate FIRMS rectangle. The app keeps the flexible polygon for accurate map checks and derives the FIRMS request coordinates in the background.
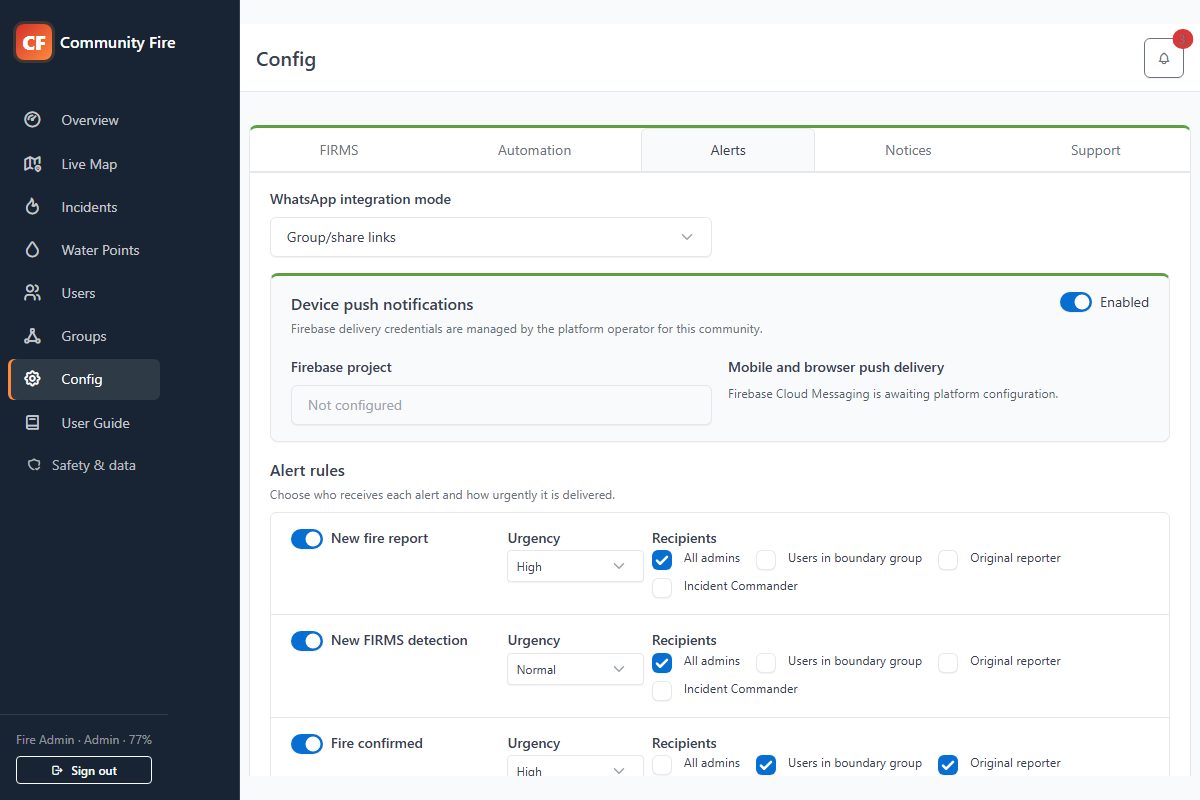
Config contains settings that apply to the whole installation, so it is not tied to the group selector. The FIRMS tab holds the NASA FIRMS key, satellite source and number of detection-history days to request. Google Maps and Firebase credentials are managed centrally by the platform operator.
The Automation tab controls how often weather, FDI and FIRMS data refresh. It also sets the distance within which water points become visible near an active fire. Entering 0 disables the relevant timer or radius behavior.
The Alerts tab controls WhatsApp mode and device notifications. Firebase credentials are provisioned by the platform operator; community admins decide who should receive each type of alert and how urgent it should be. The choices cover admins, users in the affected boundary, the original reporter and the assigned Incident Commander. Choose Save configuration once you have finished making changes.
New members start on the login page with your community code. After the code is accepted, they choose the boundary groups they need and submit an access request. Open Registration requests from Users, check the person and requested groups, then approve or decline the request. Approval sends the account setup link and an in-app, push, or email update where available.
Use Community access to rotate the join code, confirm the first-line support contact, and review requests from existing users who need another boundary group. Share the code privately with legitimate community members; rotate it if it has been posted publicly.
Announcements are short, time-bounded messages shown in the signed-in banner. Add them from Config when everyone needs to know about maintenance, an exercise, access constraints, or another community-wide matter. Choose urgency carefully and disable an old message instead of leaving it active.
The Subscription section in Community access shows the current package and renewal state. You can open Paystack's secure payment-management page, request an upgrade or renewal-time downgrade, or confirm cancellation. Cancellation stops renewal and later makes the tenant read-only; it does not immediately erase the domain, incidents, or SQLite database.
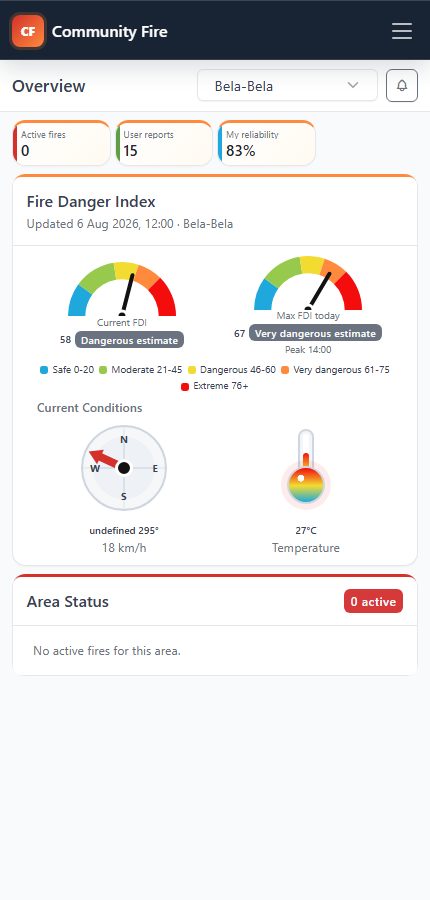
The Overview is your starting point. It shows information for the boundary group selected in the page header. If you belong to more than one group, changing that selection updates the incidents, weather and map data to the new area.
The top figures show how many fires are currently active, how many reports have been recorded and your reliability score. Reliability is based on how often admins confirm or reject the fire reports you submit, so careful locations and useful notes make a difference over time.
Before travelling or responding, read the current and maximum Fire Danger Index together with the wind and temperature. Area Status shows the fires that are still active. From an active incident you can open your navigation app or share the location with someone else.
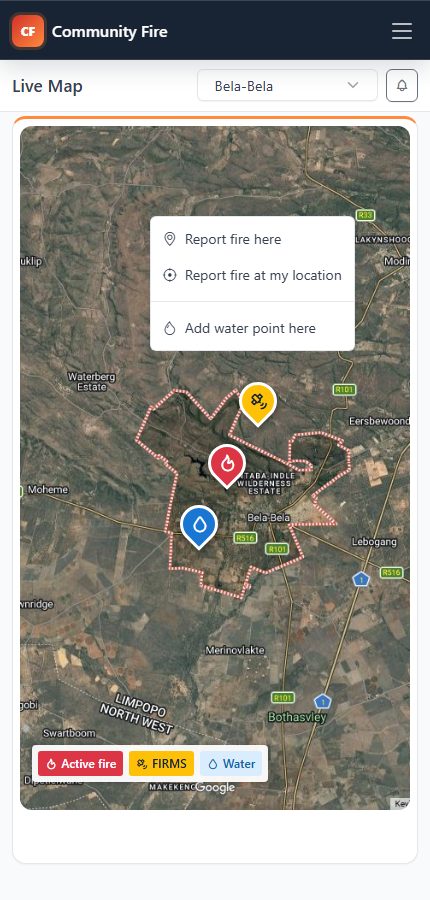
Open Live Map when you need to report what you can see on the ground. Move the map until the location is clear, then press and hold the correct point inside the red boundary. Choose Report fire here, or use Report fire at my location when you are physically at the scene.
The report form asks for severity and notes. Use the notes to tell the admin what the map cannot show, such as the direction of smoke, access-road conditions, how quickly the fire is spreading, or whether help is already needed.
You may add a photo or video of up to 20 seconds when it will help the admin assess the report. The app compresses photos before upload. Only share media you have permission to provide, keep people and private property out of frame where possible, and tick the consent box before submitting.
Check that the selected position is correct before submitting. Your report will appear in Incidents for an admin to review. A confirmation improves the evidence behind your reliability score, while a rejection is also recorded, so it is better to report carefully than quickly guess a location.
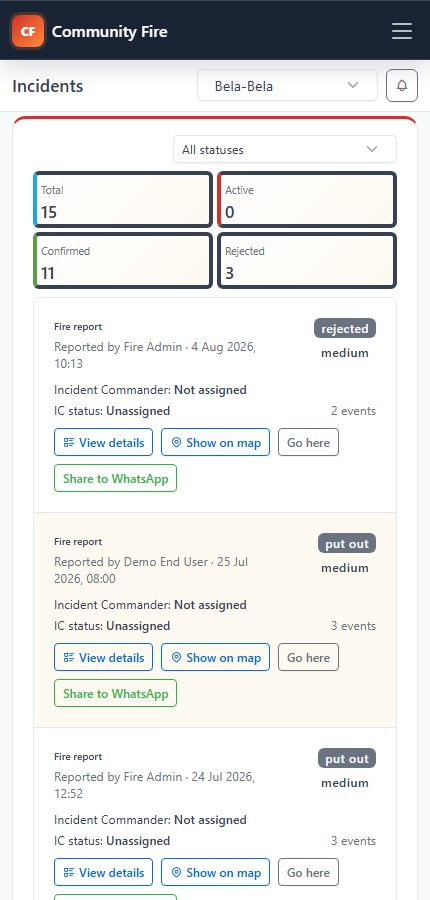
Incidents opens with Active only selected, which keeps the page focused on fires that may still need attention. Change the filter when you want to look back at reports that were confirmed, rejected, brought under control or put out.
Select View details to read the original notes, current commander information and timestamped event history. This is the best place to check whether the situation has changed since the first report.
Use Go here when you need your device's navigation app to take you to the incident. Share to WhatsApp creates a message containing the location so another person or group can open it with the navigation app configured on their own device.
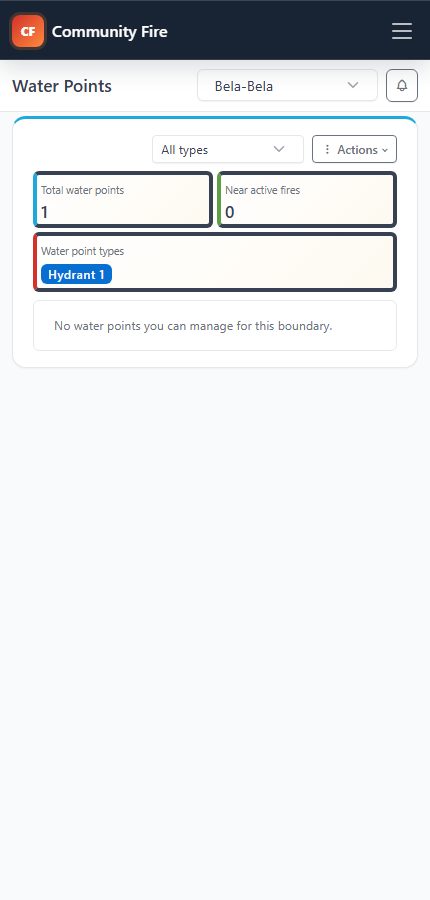
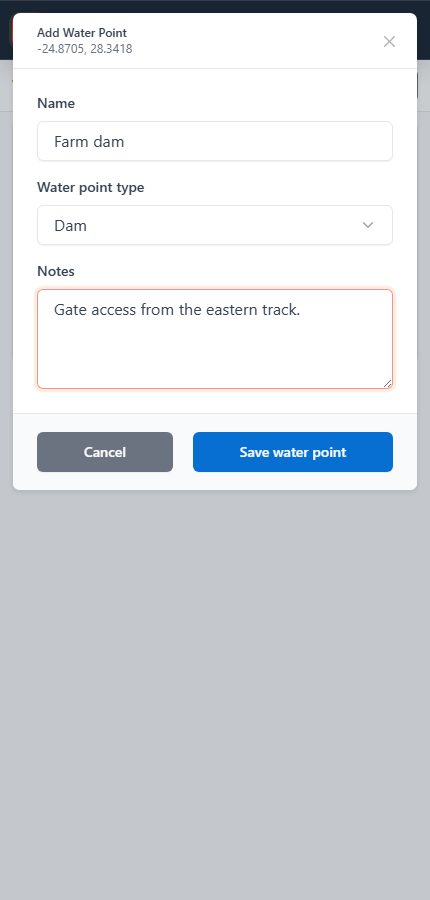
The Water Points page helps you find practical water sources in the selected area. Use the type filter when a responder needs a particular source, such as a hydrant, dam, tank or borehole. The summary also shows which points are close to an active fire.
To record a new source where you are standing, open Actions and choose Add water point at my location. You can also press and hold a position on Live Map and add the point there. Give it a recognizable name and include access, capacity or fitting details that could save time during a response.
You can edit or delete the water points you created, while admins can maintain the full list. Each point also provides Go here for navigation and Share to WhatsApp when someone else needs the location.
Your community admin supplies the community code used on the login page. Enter it under Request access, choose the boundary groups you need, and submit your details. When approved, follow the secure setup link sent to you. If you already have an account and need another area, use Boundary access in the menu instead of registering again.
Device alerts are enabled from the notification control after your browser or phone grants permission. Tapping an incident alert opens that incident in the app. The scrolling announcement banner carries messages from your community admins; you can pause or dismiss it without disabling urgent device notifications.
For account, access, or app problems, use the first-line support details shown in Login help. The app does not replace emergency calls, radio procedures, or instructions from responders. If a situation is urgent, use your community's established emergency channels first.